

Have you written the first draft of your book, but you’re not sure what to do next? The prospect of rewriting can be daunting. But if you made it to the end of your first draft, I’m confident you’ve got what it takes to do a second draft too.
Where do you start? Here’s what I do when ghostwriting or helping writers with their early drafts. I hope some of the following steps will help you revise the first draft of your manuscript too.
- Put your first draft away and take a break
- Revisit your genre and reader expectations
- Read your novel all the way through and make notes
- Sum up your novel in a few sentences
- Summarize each chapter or scene
- Start rewriting your draft using your notes
- Focus on the big-picture elements first
- Cut anything that doesn’t serve your story
- Zoom in to edit the details
- Reflect, rest, repeat
- Get ready for feedback on your story
- Conclusion
There is no such thing as good writing, only good rewriting. —Robert Graves
Put your first draft away and take a break
The first step of editing the first draft of your manuscript is to … not edit the first draft of your manuscript, at least for a while. Take a break; it’ll increase how effectively you edit later. Celebrate what you’ve achieved so far!
Stepping back means that you can look at your work with a fresher perspective when you return to your story. Time helps add some distance between you and your writing and makes it easier to see what needs to be changed.
When you feel refreshed, roll your sleeves up; yes, it might look like a grueling slog from here on out, but it’s going to be worth it.
Revisit your genre and reader expectations
You want people who will love your book to be able to find it, and genre is a part of that. Maybe you have a target genre or genres already planned, but if not, now is a good time to look into it.
It can help to consider who will read your story and what sorts of things they will be looking for or expect from the type of book you want to create. What readers expect from epic fantasy is not the same as what they expect from a travel memoir (although on some levels, maybe it is!). Does your novel deliver the story elements readers of your genre are looking for?
Knowing your genre (or genres) and target audience can also help you with the length of your novel. Are you writing for young adults or adults? This will affect things like prominent themes, language use, and word count. Masterclass has a helpful article on suggested word counts by genre.
Read your novel all the way through and make notes

Save your first draft as a separate file and give it a new name. I recommend you read it all the way through and make a note of things that stand out to you, good and not so good. You could do this on paper or use comments in your word processor. Focus on the big picture, story-level issues, and don’t worry if you don’t know how to fix any problems you find yet.
I often highlight things that I want to return to later, and you might like to write a comment at the end of each chapter about how you are feeling while reading. Was it a slog of a chapter? Did your cliffhanger grab your attention even though you know what happens next? Experience your story as a reader might.
While reading, some story-level issues you might want to have in mind are character motivation, emotion, stakes, and conflict. What is your main character up to, and why should we care? Note down any plot holes or unanswered questions. Does anything feel off? Are there inconsistencies like making pancakes for breakfast but eating toast?
Sum up your novel in a few sentences

Now you’ve read your first draft all the way through, how would you sum up your story in as few sentences as possible? Can you do it in one? Think about the central problem your main character has to overcome or their key transformation. This can help you find the core of your story and gives you something to keep in mind as you get stuck into editing in the next step.
Historical and speculative fiction author K. M. Weiland gives some advice in “3 Steps to Find the Heart of Your Story.” Once you’ve got your goals in mind, it’s time to sharpen your pencil, or, you know, mouse?
Summarize each chapter or scene
After figuring out the core of the story, what it’s really going to be about, I like to read through the first draft again and make more purposeful notes. I note down the important elements of each chapter in my chapter summary document, which you are welcome to use as a template:
You could fill in main events, characters present, reflections from your rough notes, and any ideas you have about what you want to change. You don’t need to write in vast amounts of detail if you don’t want to, but this set of notes will help you navigate your manuscript when you want to make changes.
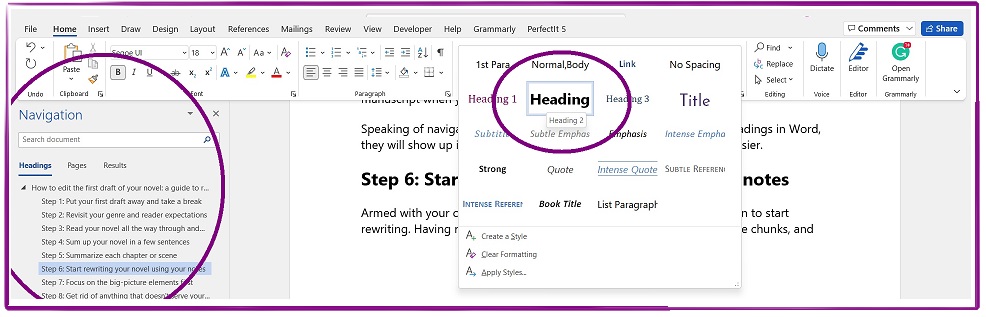
Speaking of navigation, if you format your chapter numbers/titles as headings in Word, they will show up in the navigation pane and make your rewriting life easier. (I use Office 365 and it appears when you press Ctrl+F.)
Start rewriting your draft using your notes

Armed with your chapter summary notes, you are now in a great position to start rewriting. Having notes helps you break down your task into manageable chunks, and you can pick up and put down your work without losing track of what you are trying to achieve or completely forgetting about small details that you want to return to later.
You don’t have to make your changes in order. Identify any easy wins; are there any quick changes you can start with? Once you’ve made a start, identify any big chunks of your first draft that need to be moved around. Now is a good time to move things into the right place in your story, such as a scene you have found a better home for. It will make the rest of the rewriting process easier.
Break things down into chunks and tackle tasks one by one. There’s no rush to do it all at once, right? When you get stuck in, you might find it’s not as bad as you expected!
Focus on the big-picture elements first
Don’t make the mistake of crafting beautiful sentences that don’t serve your story. It is much more helpful to focus on the big-picture, story-level issues first. You don’t want to spend ages perfecting scenes that you will later cut.
Is something happening in every chapter or scene that contributes to plot development and/or character development? Is there a balance of narrative and dialogue? Is someone sitting on the sofa thinking for a really long time?
Every scene should have a purpose and be engaging to readers. Scenes should help readers understand the characters and story better and make them want to keep reading. You probably want your scenes to draw readers in, orient them in time and place, and escalate the tension towards some sort of change that affects the story.
Look at your chapter endings. If they are all in the same format, such as neatly wrapping up the end of the scene in a tidy bow, you might consider adding some variety like a cliffhanger, a realization, or a reflection. Louise Harnby gives excellent examples of different types of chapter endings loaded with suspense, which can be applied to multiple genres.
Cut anything that doesn’t serve your story

The purpose of this step is to identify where cuts need to be made. This can be a challenging step because you’ve spent a lot of time and effort on those words! The best way to approach this step is to imagine how it will benefit your story as a whole and maximize reader enjoyment.
If any scene isn’t pulling its weight and contributing to your story, it’s got to up its game or go. It can be hard to delete things, so try moving them to a separate document instead if you are feeling reluctant. Then you know it’s not lost forever, and your novel will be better off overall without it.
You never know, something you have cut may inspire a future project. If you are not sure what a scene is contributing, ask yourself if the ending of your story would still make sense if you deleted it. If the ending is unaffected, it can probably go.
Zoom in to edit the details
Now you are confident that everything is in the right (or better) order, you can take a closer look at your sentences. If you’re feeling apprehensive about this stage, just focus on little tweaks that will improve your writing overall. What do you like or not like the sound of? Are there any sections that are unclear or repetitive?
You might like to look out for things like accidentally changing tense or head hopping at this stage, if that’s relevant to your writing. Have a look at the dialogue. Is it adding to plot and/or character development? I think it’s more important for dialogue to be effective than exactly like real life.
Are there any words that can be cut from your novel to make it more concise and readable? Excessive adjectives, adverbs, and flowery language can be trimmed to make your writing more impactful. By cutting these words and phrases, you can focus on the most essential elements of your story and create a powerful narrative that engages your readers.
Reflect, rest, repeat
Reflect on whether your core message is coming through. Check your chapter summary document. Is it covered in satisfying ticks, smiley faces, and green highlighting like mine? Congratulations, now you have your second draft! You may well want to put it away again while you take a well-deserved break.
When you’re ready, read it through and take notes again. Now you are more likely to be focusing in on paragraph and sentence level issues. Do any sentences still sound clunky? Is your dialogue a little too realistic? Have you spotted repetition, overwriting or redundancy? Had a great idea how to describe someone’s look or an item of furniture? Great! Now is the perfect time to add it before asking other people to read your work.
Of course, how many drafts you do before you want other people to read your work is entirely up to you. Some writers do two or three drafts, others nine.
Get ready for feedback on your story

There’s no definite moment when your novel is ready, and you might feel like you are taking a leap of faith. You will want to seek out sources of feedback that will be constructive rather than discouraging.
All feedback has the potential to sting initially, even when phrased kindly. This is just how are brains are wired up to be sensitive to perceived criticism. You might be part of a writing group, have a critique partner, or have some beta readers lined up. Although geared towards non-fiction authors, this Scribe article has some insightful tips for working with beta readers.
Have you ever reread a book several years later a felt like you were reading a completely different book? Every reader reads the same book differently, interpreting what they read in their own unique way. Beta readers might not be able to tell you how to fix your story, but they will be pretty good at spotting issues. Remember, try not to take feedback to heart but use it selectively as an opportunity to grow as a writer.
Once you have integrated feedback from beta readers and/or a manuscript critique, you may consider a more focused professional edit to smooth your writing and spot remaining errors. Ideally, all books would benefit from several rounds of professional editing, but if you are self-publishing, budget is likely to be a constraint. See my post on different types of editing to find out which might benefit your story the most.
Conclusion
Rewriting is an essential part of self-editing. It’s ok if you think your first draft is rubbish (I think my first drafts are rubbish!) because many authors agree that it’s in the rewriting where the magic happens. You are probably going to edit your first draft multiple times, but once you get going, you might find it’s not as bad as you expected.
“The first draft is just you telling yourself the story.” ―Terry Pratchett
How many drafts do you usually do before you let anyone read it? Can you sum up what your novel is about in one sentence? Do you have any top tips for getting started on editing your first draft? I’d love to hear your ideas!

You might also like:

Leave a comment